ANATOMY – PART 2
LANDMARKS
If you want to master the human form, you’ll have to learn at least some clinical terms. But stick with it! It will pay off in the end.
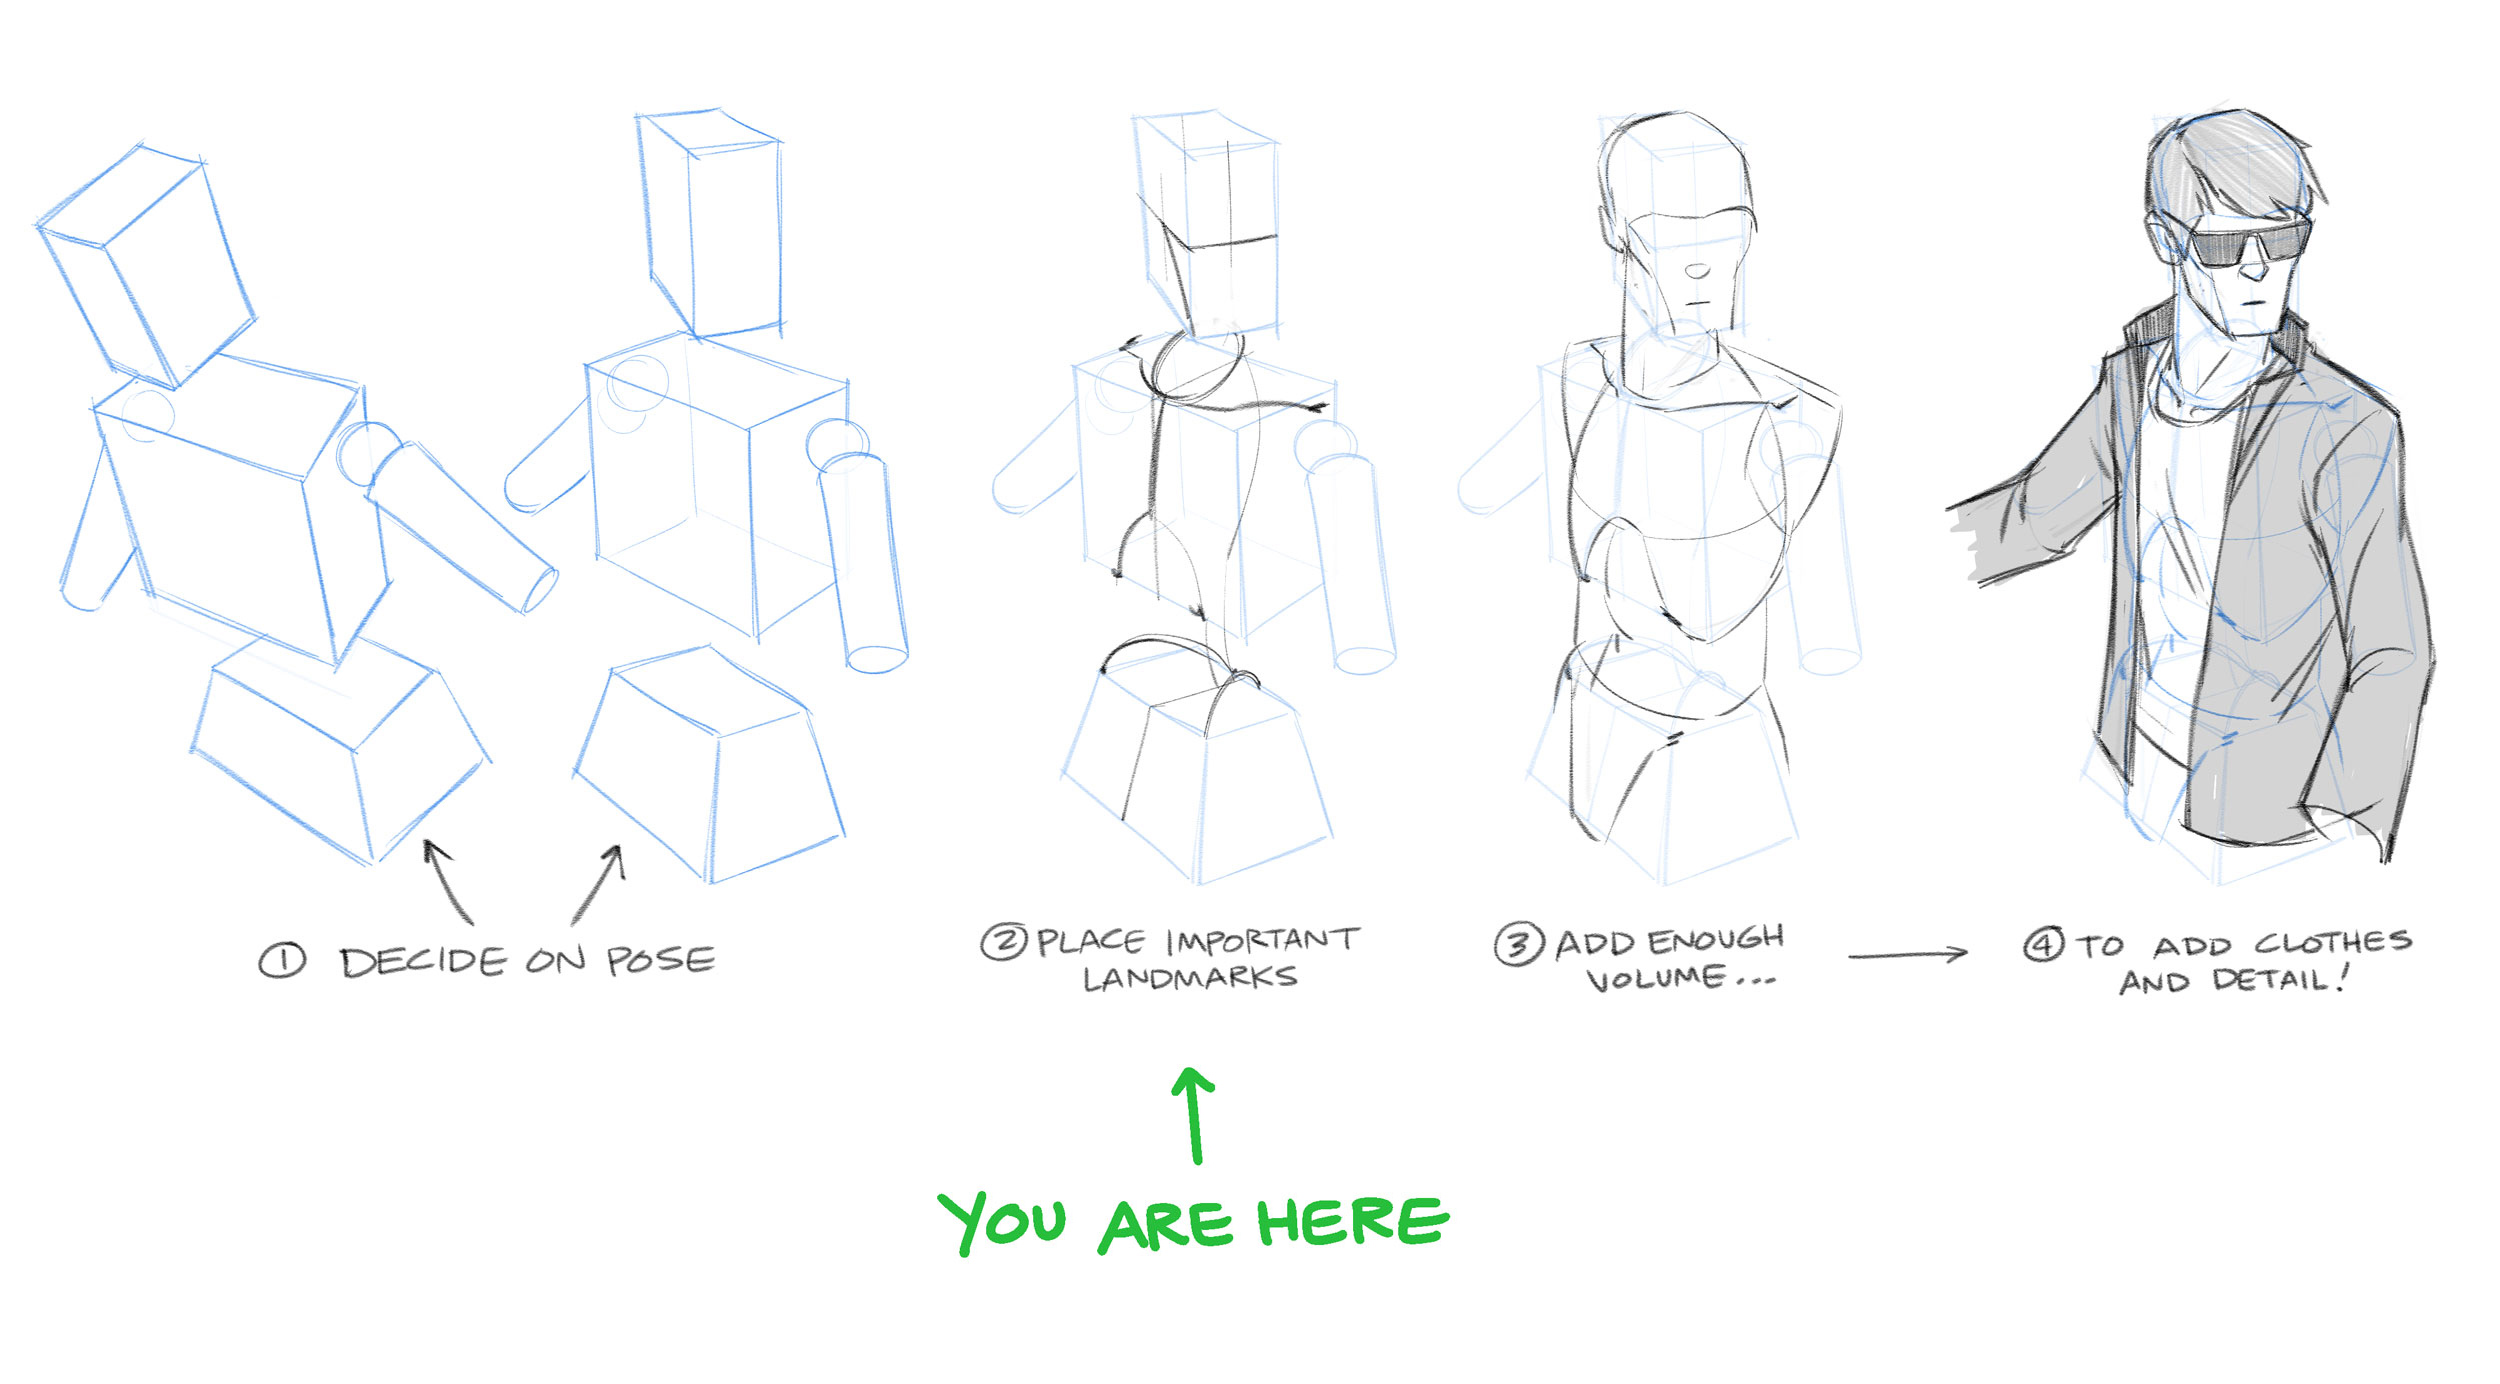
But first… Did you master the ability to create the simple mannequin in various poses? If not, make sure to review the exercises in Introduction to Anatomy before moving on. If so, you’re ready for the next stage!
Simple boxes create structure for landmarks
Some of the most important anatomical elements you should memorize are called landmarks. Landmarks are bones or segments of bones that are usually visible on most bodies that will help you place other structures more accurately. Regardless of your body fat index, you’ll likely be able to find them on yourself if you know where they are. Here are a few to get you started:
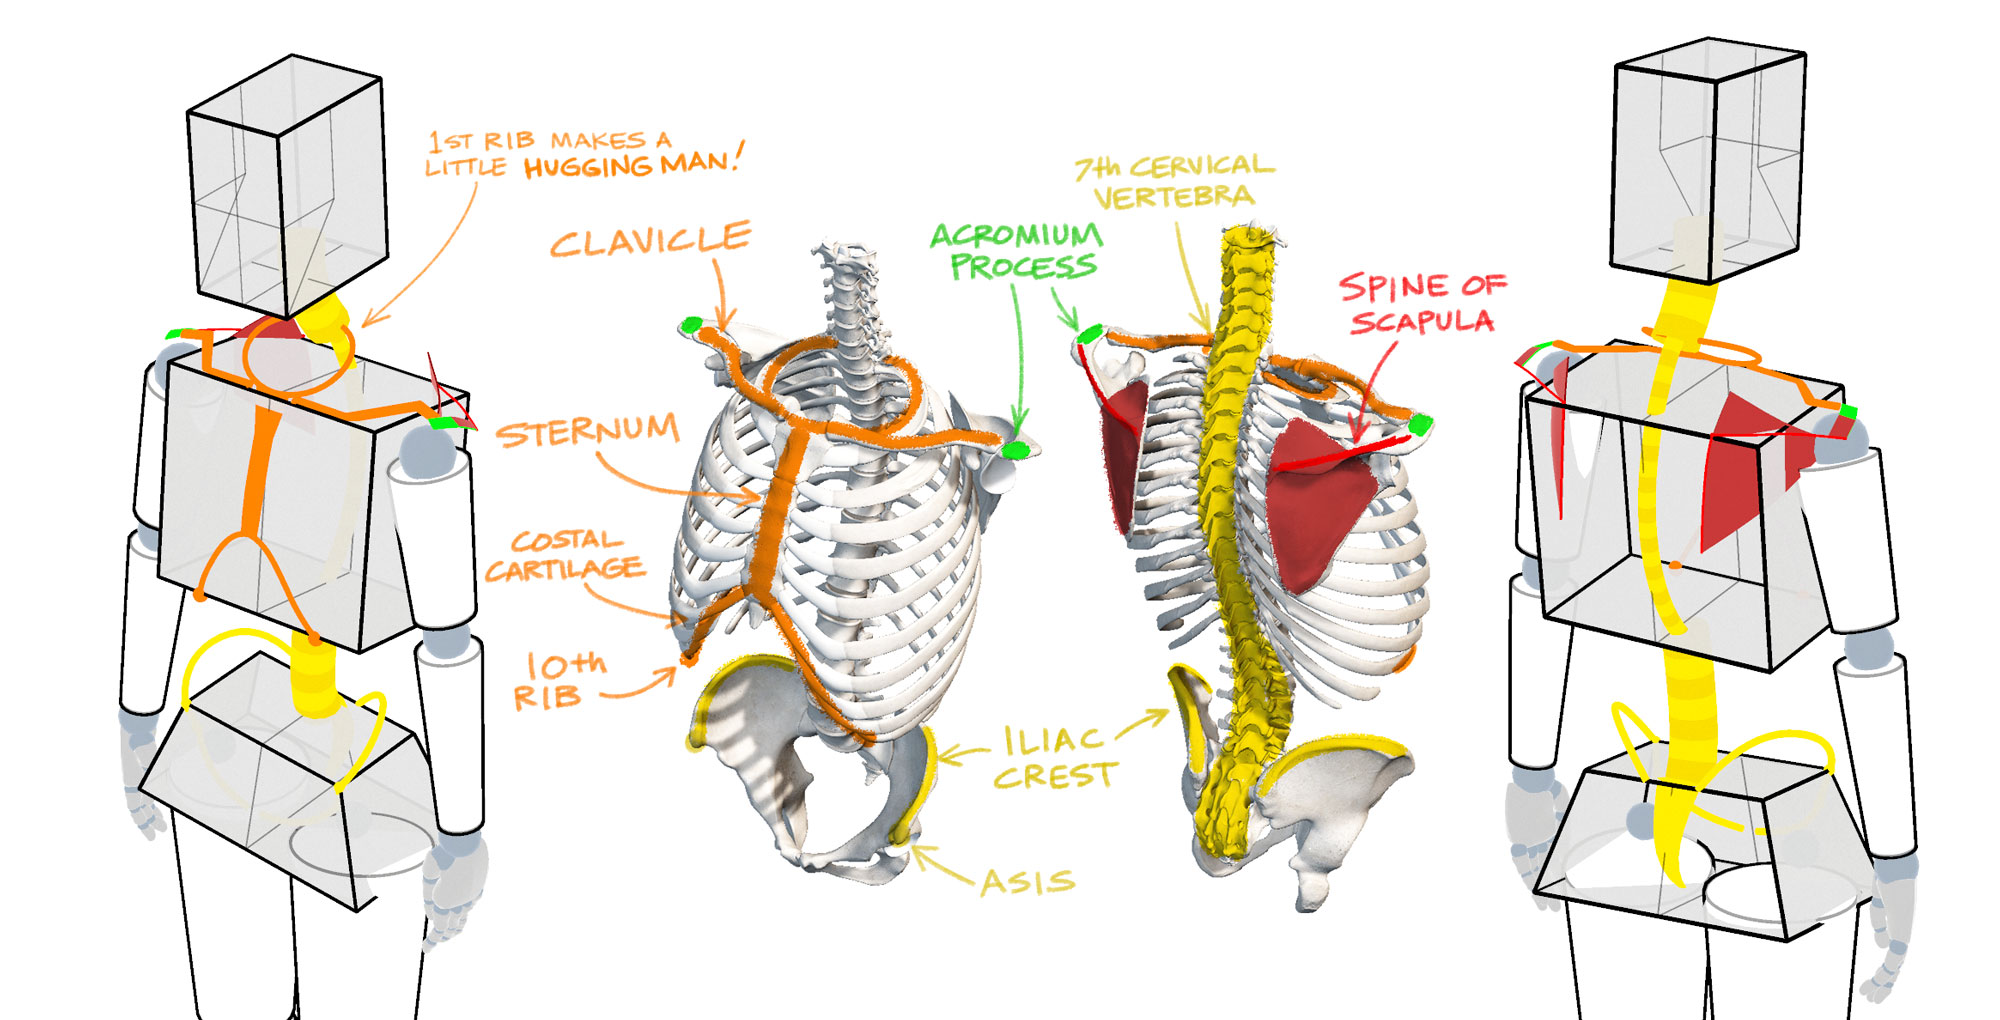
Click on the 3D viewer below to see our mannequin with these additional landmarks. Notice how the shoulder sockets’ range of motion is greatly influenced by the movement of the clavicles. The little “Hugging Man” shape, formed by the first rib set, clavicles, sternum, costal cartillage and tips of the 10th ribs are a great way to remember and discover movement of the shoulder girdle.
As you explore the 3D Landmarks Mannequin below, pay attention to the clavicles’ incredible range of motion, and how the pit of the neck (between the clavicles) defines a central point for the motion of our arms.
Now identify those landmarks on the skeleton.
See if you can identify some landmarks on yourself.
If you can get through the painful puns this guy is great! (Come on, it’s only 12 minutes).
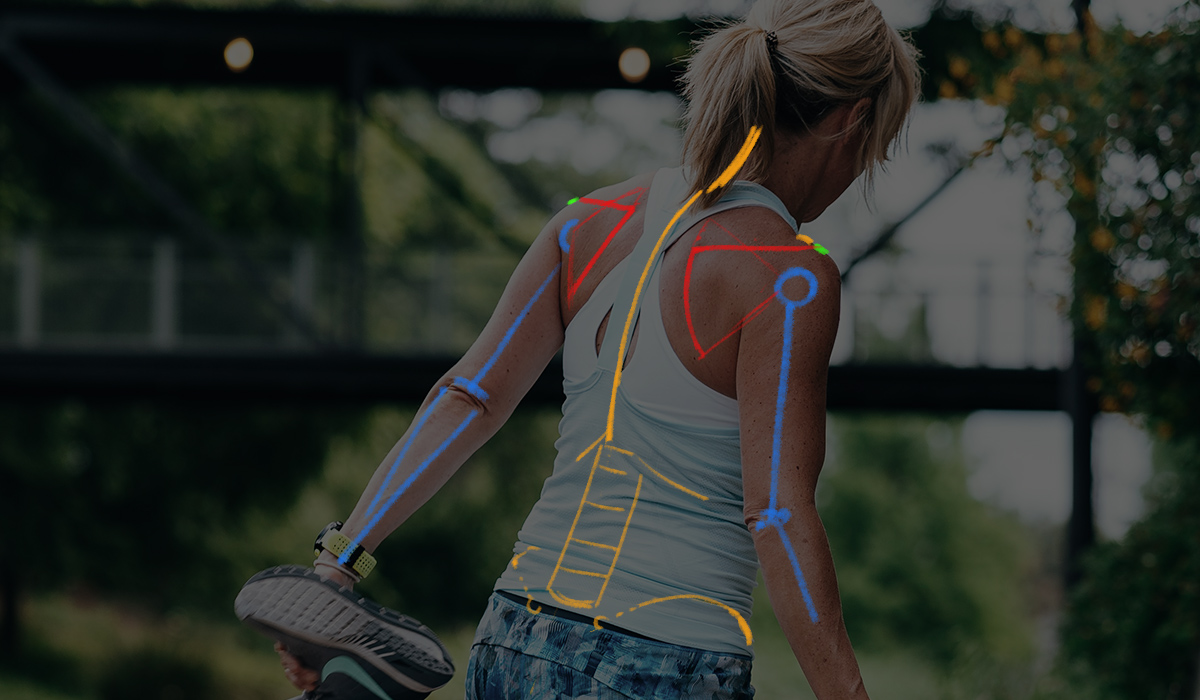
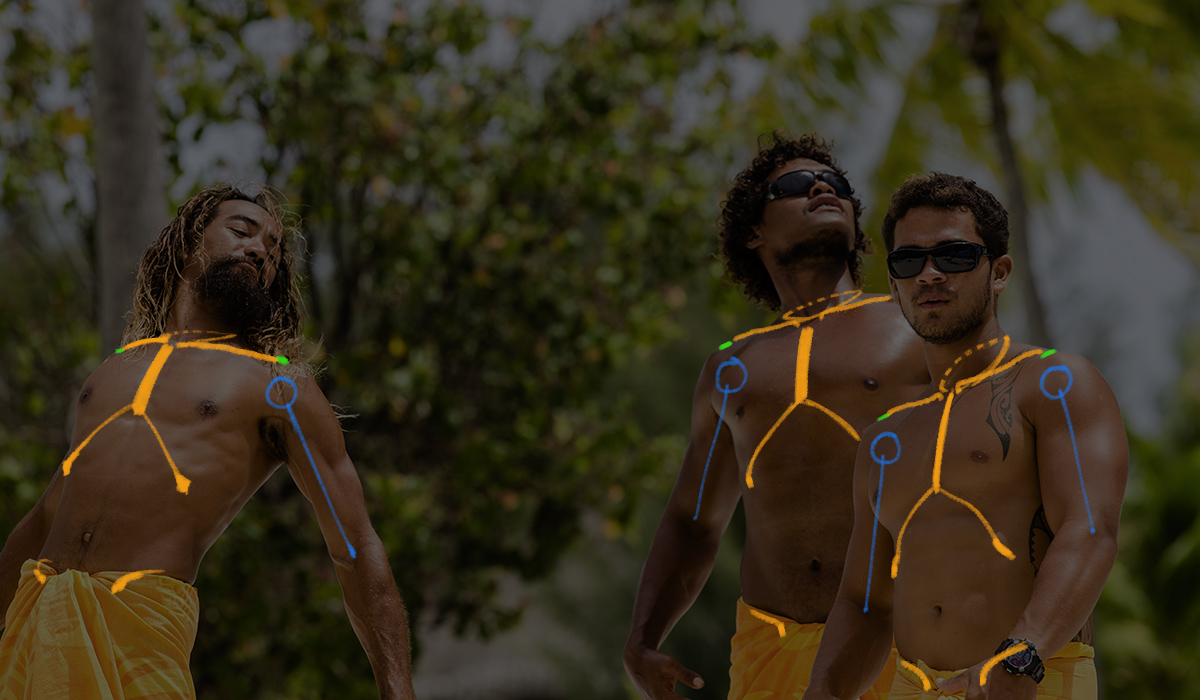
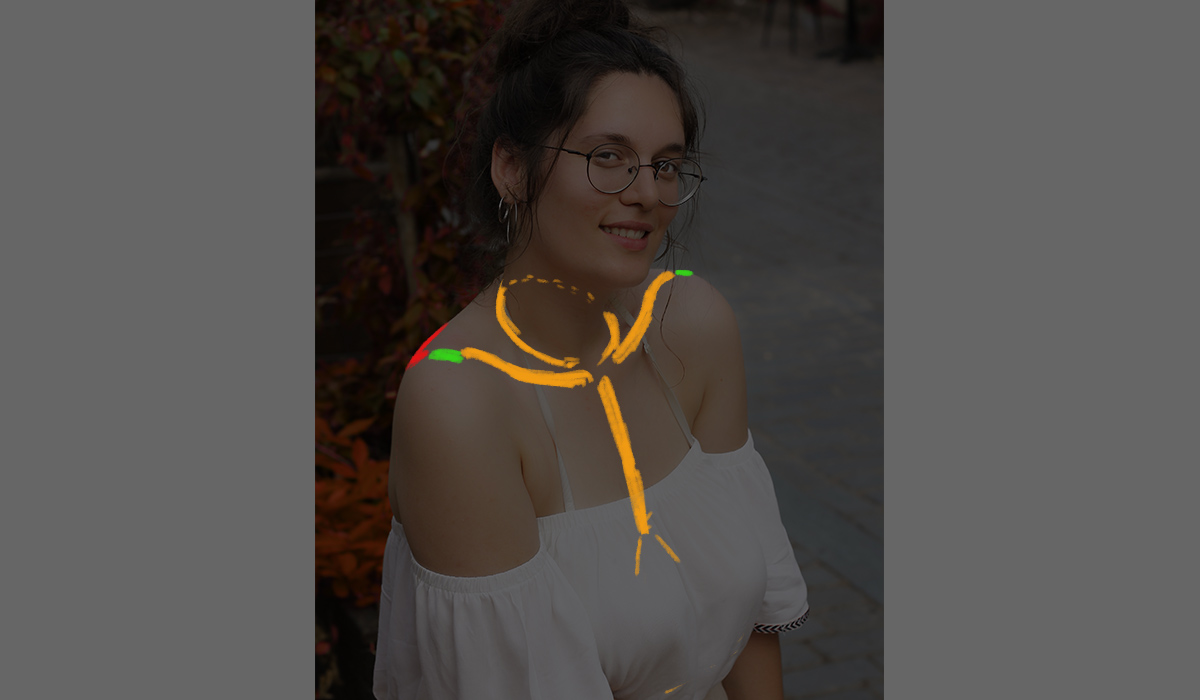
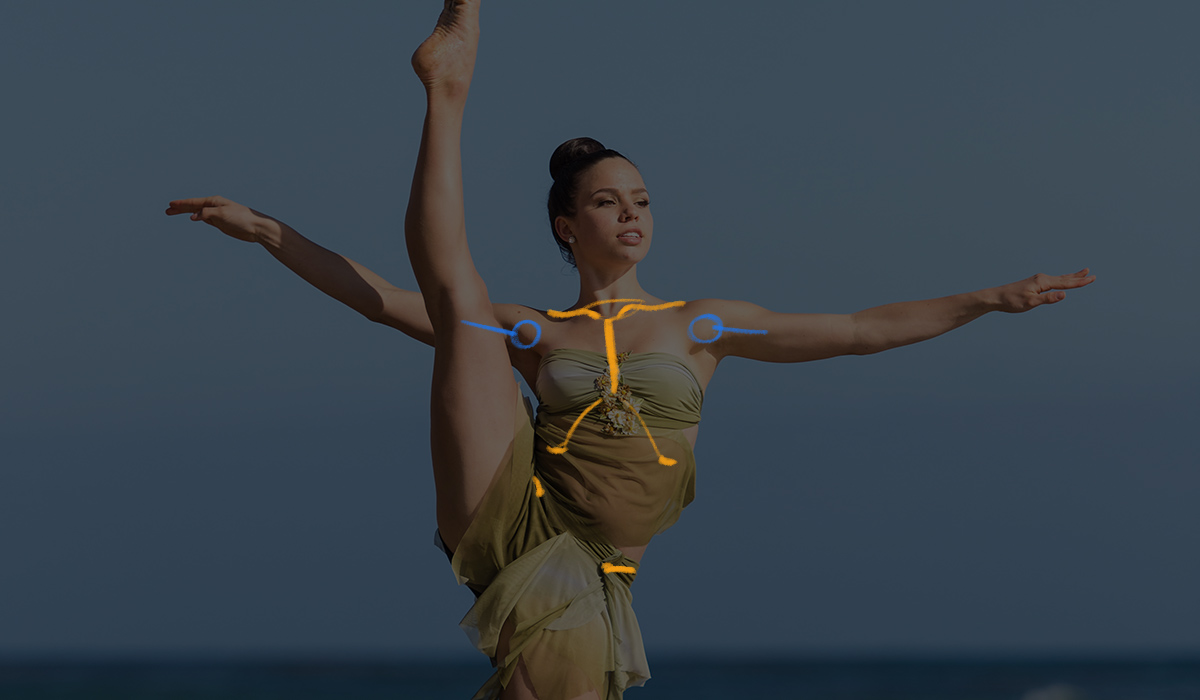
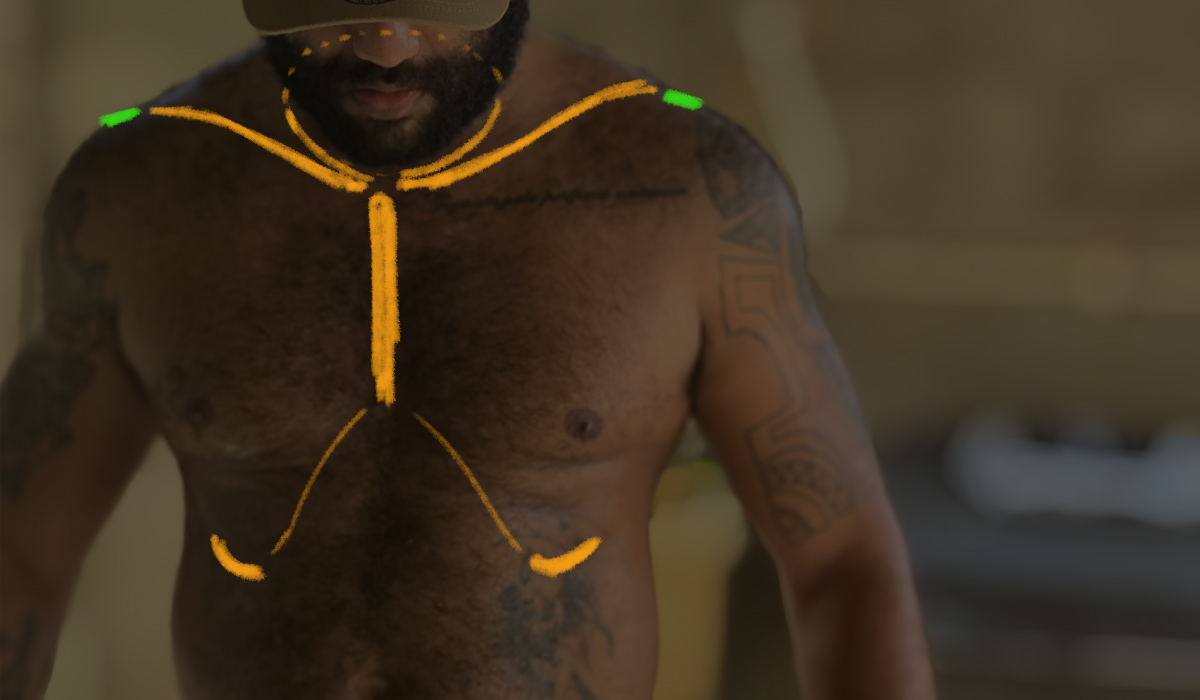
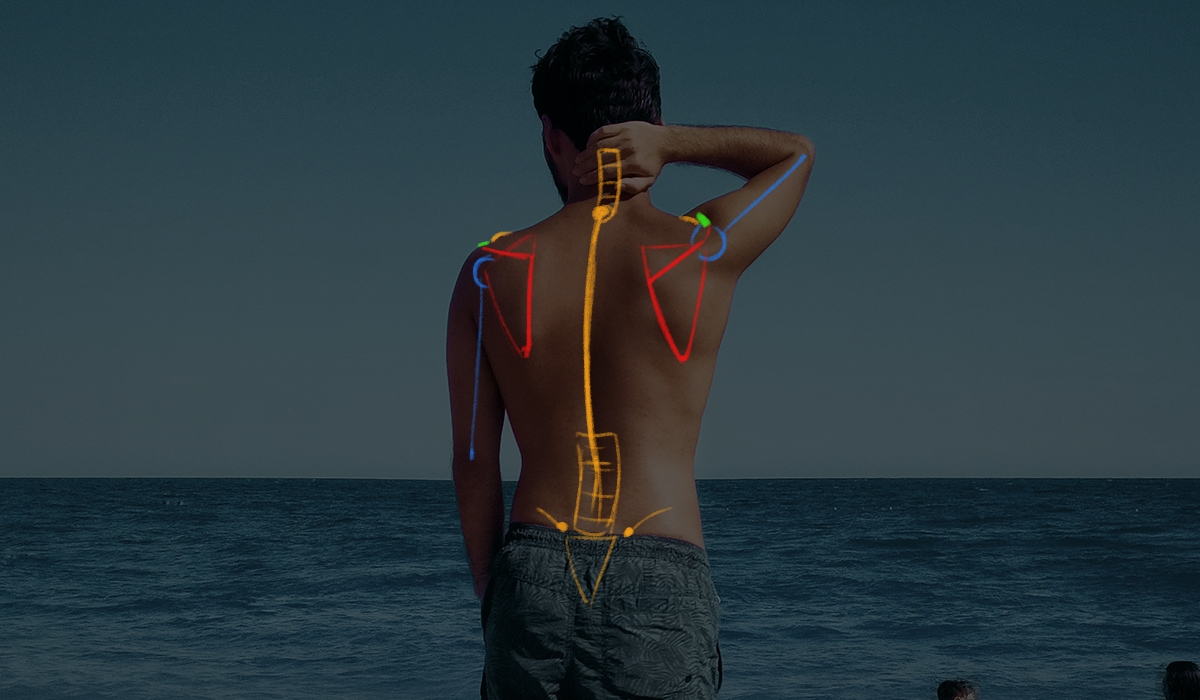
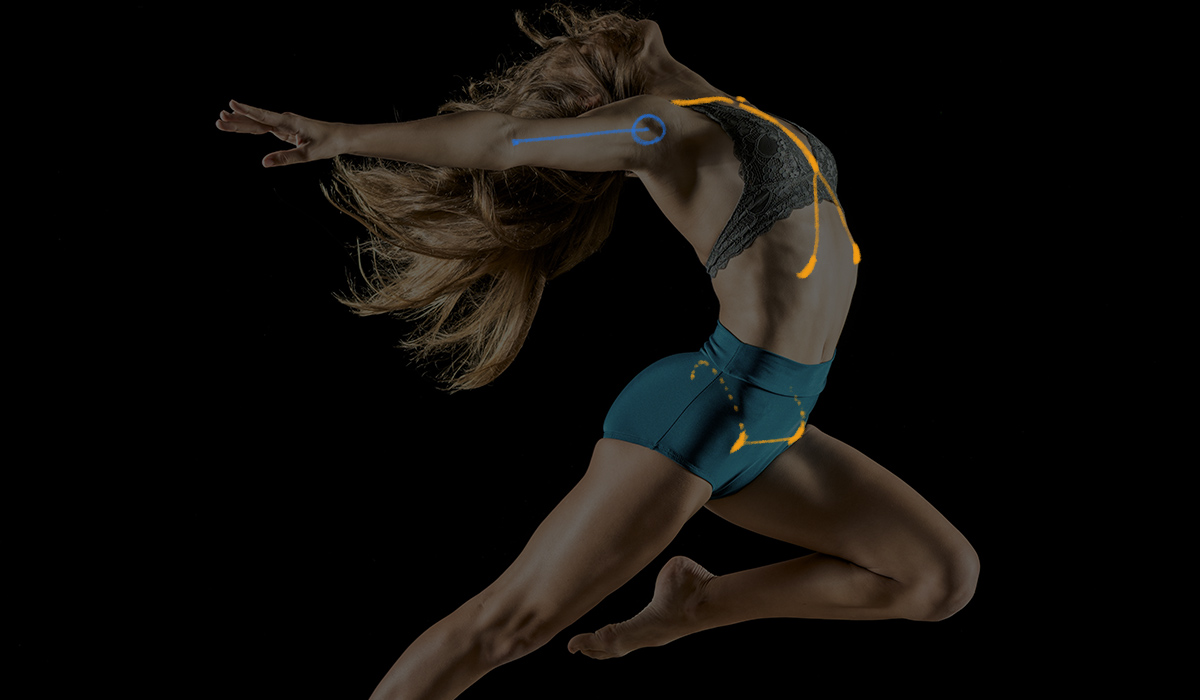
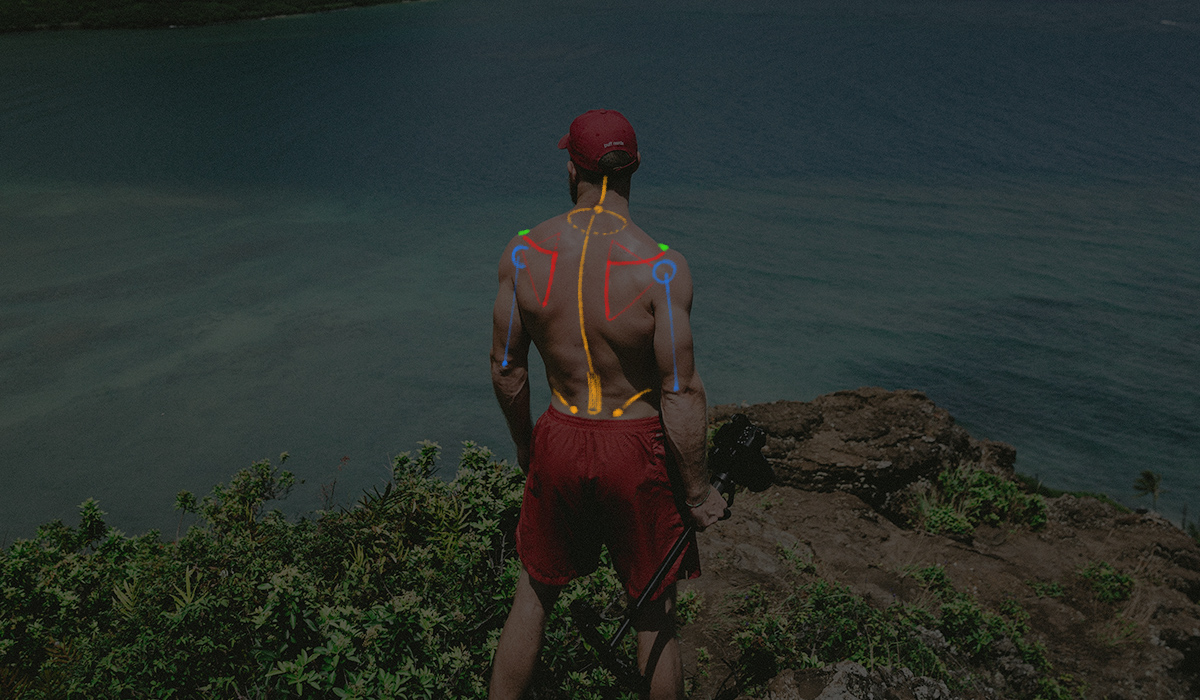
Take a look at some of these landmarks in real life. In the gallery below, hover over the image and click the right arrow to see annotations on each photo. Before moving to the next one, see if you can identify any of the following:
- acromium processA flat plane attached to the end of the collarbone. Deltoid muscles originate there.
- collarbonesFind the pit of the neck and trace outwards. The arms of the Hugging Man.
- sternumFlat vertical plane down the center of the chest. The body of the Hugging Man.
- costal cartilage / 10th ribThe legs of the Hugging Man.
- spine / medial ridge of the scapula Sharp angular forms near the shoulders.
- scapulaLots of muscles attach here, look for trangular forms.
- iliac crest / ASISMore apparent on some people than others. Look for sharp, corner-like points around the hips.
- cervical / thoracic / lumbar spinal segmentsLook for small bones on the neck and deep ridges along the back.
Explore the 3D animation below to see how much range of motion comes from the movement of the clavicle.
TIP: you can select the muscle groups, then click the label menu to hide them and just see the skeleton.
Upper Torso Playlist
In tandem with learning the landmarks mannequin, you should start watching videos that describe or show anatomical movement. But don’t panic. At this point, our goal is to master drawing the simple Landmark Mannequin. Also, as artists, we’re just concerned with some of the landmarks, tendons and muscle groups (only the ones we can perceive on the surface). However, hearing and seeing the various structures and ranges of motion will only reinforce the important visual shapes you need to remember. The sooner you start seeing them, the sooner your brain will record them to access later on.
As the Education part of the Anatomy D.I.E.T., make sure to watch all the videos in the playlist below (click the playlist icon on the top right to select other videos). It’s best to watch them on separate days, since it will give your brain a rest and allow it to digest between segments. Some are anatomy lessons and some are exercise videos, but as you watch, concentrate on identifying the shoulder girdle structures.
Click the Playlist icon to select other videos ↓
Over the next two weeks, do each of these exercises on separate days. They don’t have to be in order, just as long as you do all four within each week.
| D | Open the 3D viewer of the Landmarks Mannequin above and find an angle and pose you like. Do your best to duplicate it by just looking at it, using the four techniques for duplication. |
| I | Without looking at any reference, try to invent your own landmarks mannequin poses. They will come out looking really bad at first, but don’t be discouraged and don’t throw them away! This will stretch your brain’s recall of what you’ve been studying. Keep early drawings so you can see progress later on. |
| E | Watch all of the videos in my Upper Torso Playlist on separate days. Even if you’ve seen one before, watch it again. Every time you do, pay attention to the landmarks discussed in this section and see how many times you can identify them. |
| T | Open the 3D viewer of the Landmarks Mannequin and find various angles and poses you like. Take screenshots and trace them, focusing on finding each object’s vanishing points and thinking about how the primitives are rotating in 3D space. |
How to bring it all together
So far, we’ve been seeing three versions of the upper torso:
- As a mannequin
- As a skeleton and muscle groups
- As actual people
How do we bring it all together and when do we use each?
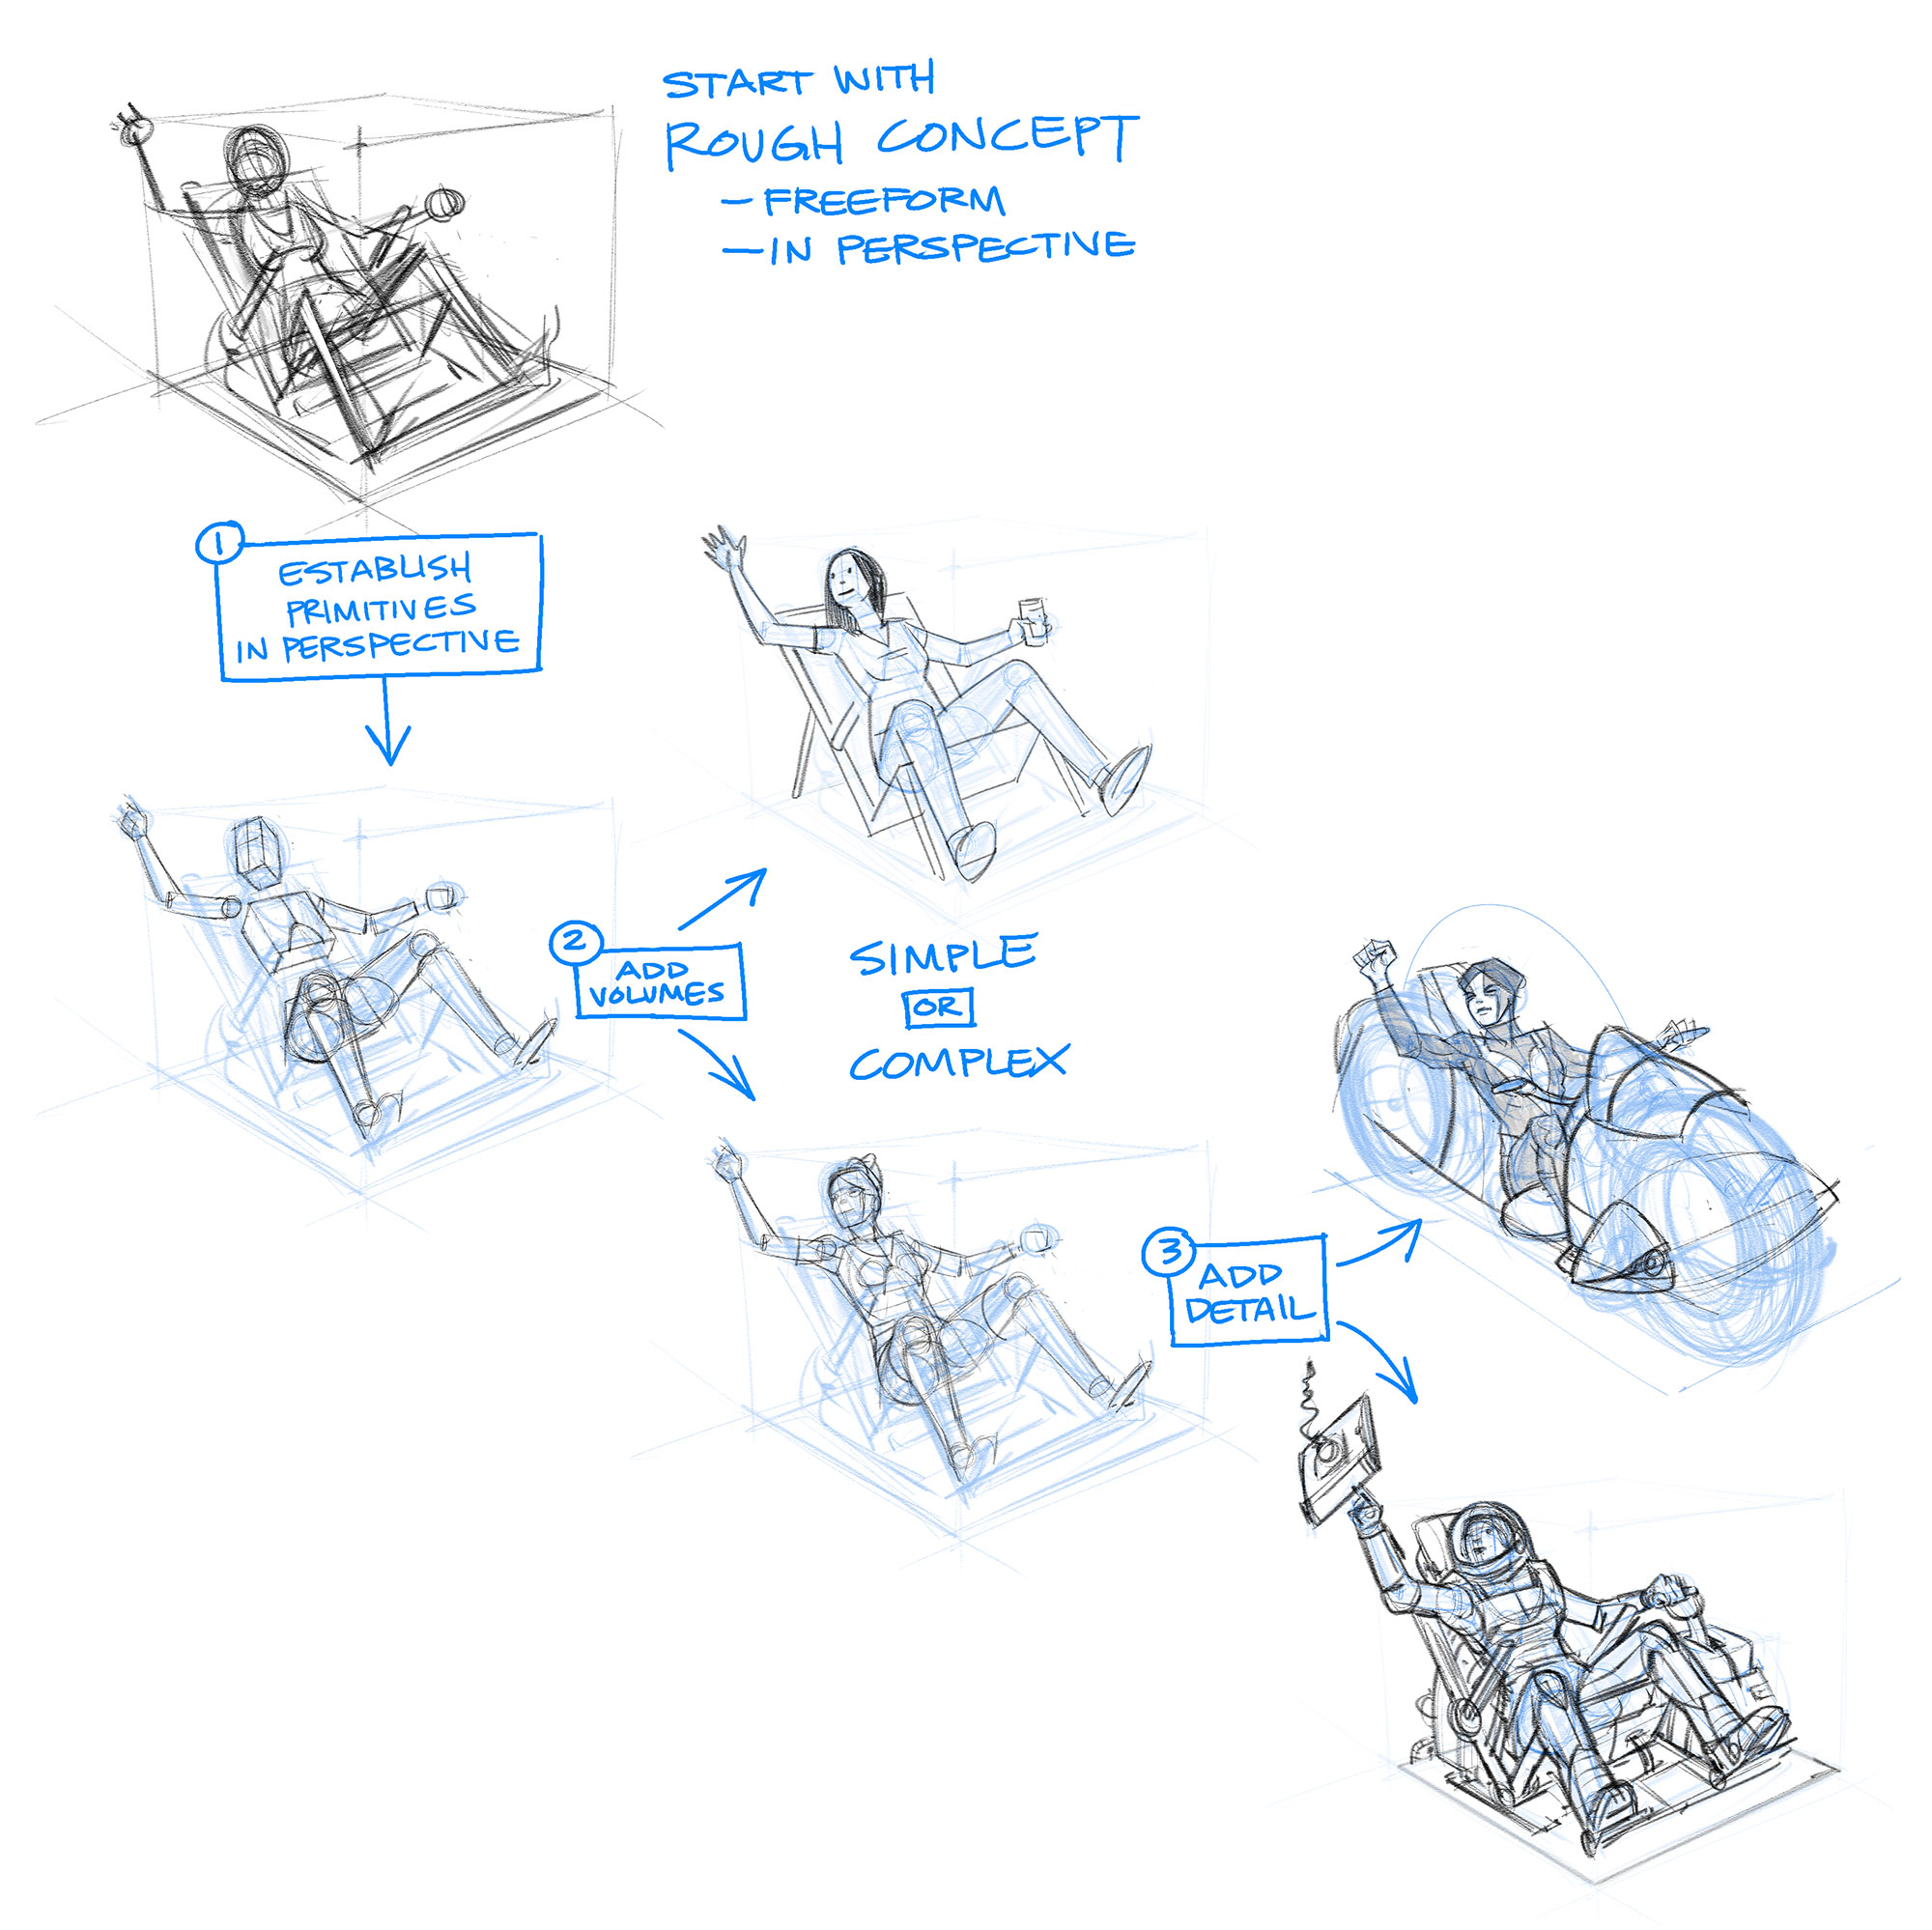
- Use the mannequin to establish your figure in perspective and place landmarks
- Use book knowledge of skeleton and muscle groups to create simple volumes
- Use observational knowledge of actual people to add detail
The depth and intensity of the anatomical knowledge you’ll need to learn depends on what kind of art you’re creating. If you’re mostly thumbnailing for rough storyboards, then only a few extra simple volumes on top of your mannequin can be enough for you to express a character’s action. If you’re creating stylized characters that are mostly clothed, then only a moderate amount of muscle anatomy may be needed to understand how the clothes should fit. If your goal is to create comic book superheroes, then plan on spending a lot of time learning about complex muscle groups.
This is how you should approach everything you draw. Identify primitive mannequin shapes, apply volumes, and decide on a level of final detail.
Soon, you’ll be doing things like this:
But one step at a time! For the torso and shoulder girdle, let’s move on to this second step of applying anatomical volumes by looking at some simple skeletal and muscular anatomy.
| JUST CHECKING IN |
| Have you been applying the D.I.E.T. suggestions in each section? If not, and you are frustrated with your progress, consider doing so! It's been designed to stretch different parts of your creative brain. Even if you have been drawing a long time but are just learning anatomy, the process of Duplicating, Inventing, Educating, and Tracing will accelerate your skillset. |
Help keep art education affordable
Creating art is something everyone should be able to learn and enjoy. Through my YouTube channel, I love providing free training for kids and young, talented people who are hungry for learning but may not have the means or parental support to pay for art education. But, producing clear, helpful video tutorials and other online content takes time and effort! If you’re an adult who has benefitted from my free training and would like to support my efforts, please donate! Your contribution is much appreciated and helps keep valuable technical training accessible and within reach.


